FRT-Lab Virtual Machine Set-Up and Connection Guide
Step 1: Download and setup the Microsoft Remote Desktop application
1.a. Download the “Microsoft Remote Desktop” app from the app store: Download link
1.b. Open the Microsoft Remote Desktop app.
1.c. If a “Help us make your experience better” prompt appears, click “not now.”
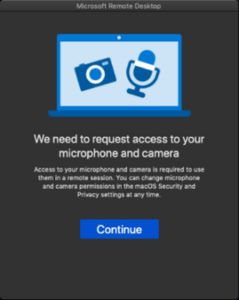
1.d. The first time it is run, the Microsoft Remote Desktop app will request access to the local computer’s microphone and camera. This functionality is not required to access and use the Rotman Finance Lab virtual workstations, however, it is safe to enable these permissions if desired.
1.d.1. Click the “Continue” button
1.d.2. Click either “Don’t Allow” or “OK” to either disallow or allow the camera access as desired. Repeat for the Microphone permission prompt.
Step 2: Setup the virtual machine
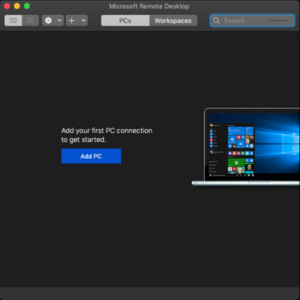
2.a. On the main “Microsoft Remote Desktop” app window, click the “Add PC” button.
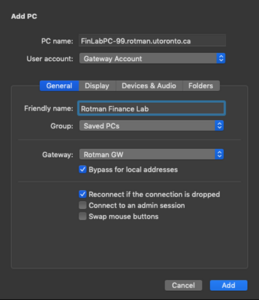
2.b. On the “Add PC” window, enter the full name of the remote PC (including the “.rotman.utoronto.ca” domain suffix) in the “PC Name” field. (e.g. if the provided PC is called FinlabVM-99, enter FinlabVM-99.rotman.utoronto.ca into the “PC Name” field.)
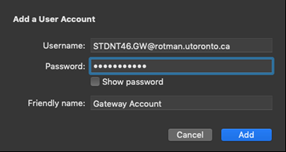
2.c. Click the “User account” field and select “Add User Account…”
2.d. On the “Add a User Account” screen, enter the following:
2.d.1. In the “Username” box, enter the full username of the provided “Gateway” account, including the “@rotman.utoronto.ca” domain suffix. (eg. If the provided Gateway username is STDNT46.GW, enter STDNT46.GW@rotman.utoronto.ca in the “Username” field.
2.d.2. Enter the password for the “Gateway” account in the “Password” field
2.d.3. In the “Friendly Name” field, enter “Gateway Account”
2.d.4. Click the “Add” button to finish adding the account and return to the main “Add PC” window.
2.e. Once back on the main “Add PC” window, enter “Rotman Finance Lab” in the “Friendly Name” field
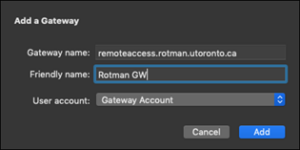
2.f. Click the “Gateway” field and select “Add Gateway…”
2.f.1. In the “Gateway Name” field, enter “remoteaccess.rotman.utoronto.ca”
2.f.2 In the “Friendly Name” field, enter “Rotman GW”
2.f.3. In the “User Account” field, select “Gateway Account”. This is the account which was created in step 8.
2.f.4. Click “Add” to finish adding the gateway and return to the main “Add PC” window.
2.g. Ensure that “Rotman GW” is now listed in the “Gateway” field, and click “Add” to complete adding the PC.
2.h. The Remote workstation has now been added and can be quickly accessed from the main “Remote Desktop” app window going forward.
Step 3: Connect to the Remote Workstation
3.a. Open the “Microsoft Remote Desktop” App, and double-click the “Rotman Finance Lab” icon.
3.b. If a certificate warning window appears, click “Continue”
3.c. A UTORid login screen will appear upon successful connection to the remote workstation. Enter your UTORid and password at this screen to complete the login process.
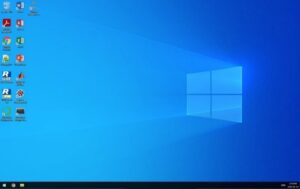
3.d. Upon successful login, a Windows 10 desktop with all required software will be available for use.